
In this session we are looking at designing for print when using Indesign, using colour. Indesign will generally be the last piece of software used out of all the Adobe creative suites to bring it all together, therefore there are elements that are needed to know before sending a product to print.
Indesign should be the piece of Software used when combining image and text for print, it is the only piece of software really that can be used to produce multiple page documents.

When creating a New document you will find that you will never use the new 'Book' option as this is a choice if you are wanting to create a more complicated lengthy book design.
Page Size - should always be the size of the completed finished, printed page size, not the A format paper size that it will fit into.

Columns & Margins - Should only be used if needed, they will not be printed onto the sheet, but will help guide you depending on the project you are working on.

Bleed - Bleed ensures that colour is printed to the very edge of printable area, this will help with double sided prints.
The bleed amount should be discussed with a printer first to ensure both parties know what is meant to be printed.

Slug - Slug shows the elements that will be printed outside the final page size, trim marks, crop marks etc, once this part of the page is cut to size, all these 'slug' elements will be lost when the page is trimmed.
Pages - any product that is being created that is in the form of a multiple page booklet, then facing pages should be used, however if you are just working on a single page format then you should not check 'facing pages'
Primary Text Frame - is a button you will check to place a consistant text box which are the size of your column width, this is useful if you are creating a publication with a lot of text so you can continue from page to page.
The page below is the layout of the page you will get if you create a new document.
Pink line - is the margin / Gutter line to show the edge of a column
Red line - is your bleed area
Light blue - is the Slug are
Black line - the edge of actual paper size.

Below shows the layout of the pages in order, each of these apages is a Master Page template, this means anything that you put onto your master page will be repeated throughout the book, this is usefu for page nmbers or continuous imagery, you can edit either master page at the top of the tab where it says 'A-Master' and this will edit each page that it applies to.

An example below
As you can see, by editing the left hand page on the master page then it repeats it on every left hand page throughout the publication, you will not be able to adjust the master page element on each individual page. If you want to do this hold Command & Shift and click on the specific page, you will be able to adjust that individual element on that individual page.

There can be endless master pages added throughout the book, if you were creating a magazine with 3 different layouts throughout different parts of the publication, then you can add 2 more master pages and edit them accordingly, this in turn helps you remain to be consistent and accurate with your repeated layouts.
Applying and printing Colour in Indesign
The application of colour works in the same way on Indesign as it does in both Illustrator and Photoshop, a vector shape is needed and you can use both fill and stroke to fill specific colours to fill your vector as needed.
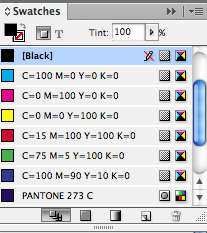
The methods of picking colours are the same aswell there are Colour Pickers - Colour Guide and Colour Swatches.
We will be using Colour Swatches again as it is the best for print.

It is pretty much identical to the Illustrator Swatches tab and all the elements remain the same.

This allows quick and consistent colours in one document, so you can colour both text and vector images.
Adding new colour swatches is again exactly the same as Illustrator, you can adjust your own CMYK colours and add when you get the one you like OR you can again use Pantone spot colours in the same way again.

Adding new Tint swatches is again done in a similar way as you can see below, this is a good technique to keep all tints of the same colour together so nothing is lost / confused.


What elements you should check on you Photoshop files before importing into Indesign
- CMYK or Greyscale
- 300 dpi
- Actual size needed (don't adjust size in Indesign)
- PSD (transparent background) or TIFF
What elements you should check on you Illustrator files before importing into Indesign
- CMYK
- .AI format or Copy and Paste
- You can scale illustrator artwork on Indesign
When placing a PSD file which consists of 2 colours, it will automatically add the 2 pantone colours used onto the colour swatches tab.


When importing Illustrator files, you can either place an image like you would with Photoshop, but you can also Copy and Paste and illustrator vector, it will paste the vector into Indesign as well as place both spot colours into the swatches panel.


When importing Greyscale Tiff files, it will import the image as black on the swatches panel, if you select the actual image by clicking the center circles of the image then you can pick any other coloured swatch and this will then apply a monotone effect, this is useful if you are choosing spot colours inside Indesign

as you can see below the image has changed its spot colour but still keeps its gradient of tone.


If you want to edit an image that has been imported into Indesign from another adobe creative suite you can select that individual image, go to file - Edit with and you can choose the software of your choice.
A shortcut to do this is Alt - Double click on image and this should open up automatically.

You can edit the image in Photoshop which I have done below and then just save the image it will then automatically change on your indesign file, if you have got a tiff like this image is below if you want to make it transparent you do the same process but save it as a PSD file and this will allow the image to remain transparent in Indesign.


this can allow you to create some interesting layouts , designs and colour using all 3 pieces of software.

To help with various types of print like Litho / Screen print, you can separately preview individual sections of a piece that that are all one colour.


This panel is very similar to swatches panel, but each colour now shows a view option, if you turn off everything but one of the CMYK colours you will notice the Indesign layout will only show the aspects on screen that are made out of that specific colour, this can help with exposing individual screens for screen print.

As you can see below these show each separate plate that will be needed for each CMYK


You must also ensure that you delete all the un-used colours from the swatches pallet before you send your work off to the printers, as if done this way unwanted colours could be incorporated into a. print.
No comments:
Post a Comment